Wednesday, October 12, 2011

Solar Temperature

Continuing on from my efforts at rendering stars described in my last post, I decided to have a look at making the visual effect a little more dependent upon actual physical properties rather than simply being a soup of magic numbers that produced an effect I was happy with. Although partially inspired out of curiosity just to see if I could, the ability to produce different star effects is required anyway if my procedural universe is to be more varied that an endless procession of yellow Suns.

Before proceeding I should stress here that my knowledge of solar physics is pretty elementary, being garnered from a bit of Wikipedia browsing and books such as the excellent "Wonders of the Solar System"  so don't call me out if anything I say here is imprecise, incorrect or a blatant lie - I don't pretent to be any kind of expert on this subject.

Conducting even my initial research into the subject however immediately revealed that the physical processes at work in a star are pretty complex, scientists' understanding of even the one at the centre of our own solar system is not completely exhaustive, so picking the correct metric(s) to base my graphical representations upon is as ever a trade-off. The more physically accurate I want the simulation to be the more work is going to be involved and the more complex and therefore slow the code will become. This is a real-time project and the effect has to render in just a millisecond or two so it has to be kept simple, in the end I decided temperature was a pretty obvious measure of how a star looks and of the various temperatures associated with a star (core, surface and corona amongst others) the optical surface temperature seemed like a good fit as it’s largely to do with the observed appearance of the star. Hereafter I’ll refer to this optical surface temperature as simply “temperature”.


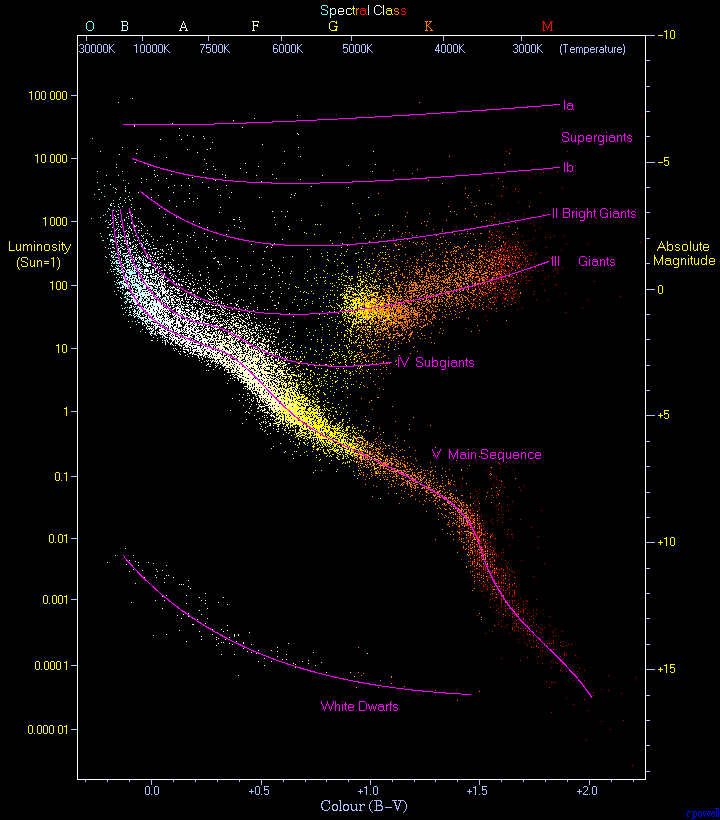
The temperature of stars is expressed using the Kelvin scale with the temperature of our own sun being approximately 5700K. (see this page on Effective Temperature or here about Spectrums for more details on this) There are also various classes and classifications used to categorise stars but one of the easiest to understand that I found is the Hertzsprung-Russell diagram which provides a really clear visual representation of the relationship between stars magnitudes/luminosities and their classifications/ temperatures.

(Image from Wikipedia)
For now I’m concentrating on rendering stars from the so called Main Sequence within which our Sun lives, but it would be interesting at a later time to experiment with rendering stars from the white dwarf, sub-giant, giant and super-giant areas. Using temperature as a base then, to render a star using the correct colour therefore I needed a way to convert this temperature value into traditional RGB values I could generate and manipulate in my shaders. It turns out that converting from Kelvin to RGB isn’t entirely trivial but I did find a site that offered a handy look up table that I could use to convert between the two. Rather than perform the conversion numerically in my pixel shader I opted to store this LUT in a tiny texture from which the colour for a given temperature within a given range could simply be read. I actually store 32 levels of each temperature in this 32x32 texture from the base colour up to a blend of a much hotter colour and white to give me something to mix in with the noise texture during rendering.

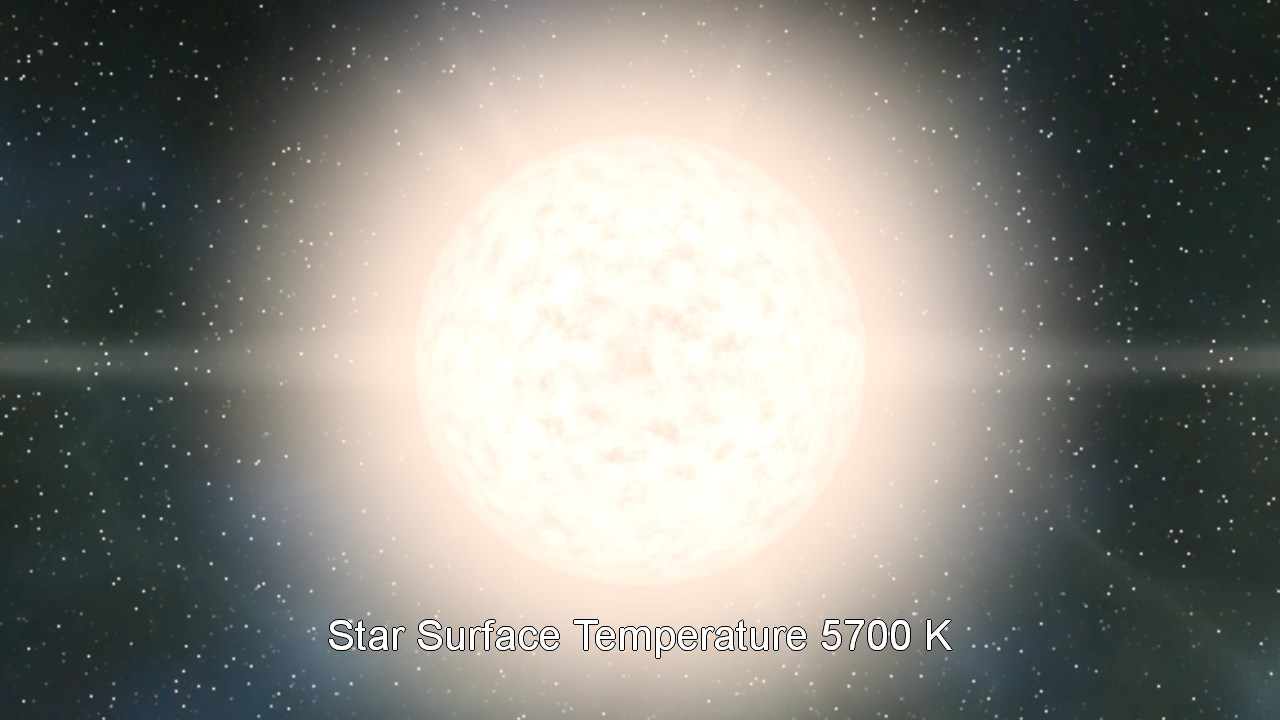
Tying this into my existing star shader was relatively straightforward, I just had to pass in the temperature of the star as a pixel shader constant then use this along with my noise value to look up the Kelvin to RGB conversion texture . I did at first think something was wrong though as at 5700K my lovely yellow and white "Sun" was rendering as a salmon pink sort of shade - not at all sun-like!

After a little more digging it would appear that along with much of the Earth's populace I've been sold something of a lie for the last four decades! Turns out that our Sun isn't actually yellow at all but is rather that fetching salmon pink I mentioned earlier, it only looks yellow from the Earth (or at times a lovely red when rising or setting) due to the absorption and dispersion of light as it passes through our atmosphere. Presumably TV and Films SFX departments use yellow when rendering the Sun from space for consistency (and so they don’t have to keep explaining why it’s salmon pink)

Anyway, happy that this wasn’t a bug in my shader I had a play around with varying this temperature value I was passing to the shader to change the visible colour of my star which produced what I think are quite reasonable results:


The temperature of each version is overlayed - an interesting fact I wasn't aware of is how the colour passes from red through yellow through white and finally to pale blue with temperature - mentally I had assumed that white would be the hottest, so I learned something there.

Note that it’s not just the colour that’s varying with temperature here, the size and “fuzzyness” of the corona is also increasing as the temperature increases – there’s no particular scientific basis for this, it just felt like hotter stars would be expected to have larger coronas. The magnitude of the screen space ray distortion is also linked to temperature, producing more erratic field movement on hotter stars.

Take a look at the video below to see the transition occurring in real time – there’s no doubt more that could be done for now I think it’s good enough for my purposes: producing a range of interesting stars around which to base my procedural solar systems.


Friday, September 30, 2011

Solar Power

Continuing to take a break from procedural architecture, I've been spending what little time I can spare looking at a completely different scale of challenge - rendering stars!

Although Osiris started out as a project focussed on generating and rendering just a single procedural planet, I've found recently the temptation to expand the scope of the project to encompass an entire procedural universe increasingly difficult to resist and to this end have been reworking many of the internal data storage mechanisms and rendering code to handle this.

Rendering a single planet presents many numerical precision challenges for computation and rendering but an entire universe makes it even more so, fortunately there is a natural hierarchy available to help so within my universe I have galaxies, within my galaxies I have solar systems and within my solar systems I have planets and stars - I'll talk about some of the challenges of navigation in such vast spaces another time but it's stars I want to focus on here.

Rendering stars is a little bit unusual in that much of the time computer graphics are trying to make their subjects look as realistic as possible but with a star that breaks down somewhat - if I were fortunate enough to possess a display capable of truly recreating all possible lighting conditions and smart enough to write code that could accurately render a star I have a feeling that the consequences for anyone and everything in the vicinity of said display would be somewhat undesirable!

Fortunately of course that's not really an issue but the point is that for games as for films and books the problem here is more to create a convincing reproduction of what people imagine a star would look like close up rather than trying to achieve a physically accurate rendition as is desirable for many other real world phenomenons.

Here's what I have come up with so far anyway:


I've focussed on creating something familiar based upon our own Sun (A G2 star according to the Harvard Spectral Classification system) and I'm quite happy with it so far.  It would be interesting to try some other parameters to recreate different classifications of stars - I'll post some screenshots if I get round to that but for now though here's how my glowey yellow ball is made up:

Unlike the planets I've been working with so far, for my purposes stars can be conveniently represented as pure spheres which made me think that using conventional geometry may not be the best way to go about rendering them.  You can certainly get a good approximation of a sphere with triangles but as the body gets larger on screen you inevitably end up with faceted edges unless a truly massive number of triangles are used.  You can also treat the sphere as a 2D disc saving a whole heap of triangles across the surface as only the edges are really significant but you then need some maths to work out the 3D points for the pixels covered by the disc.  Both these systems also suffer from being difficult to incorporate into the corona effect I wanted to achieve so I decided instead to embrace a technology that has a long and distinguished relationship with spheres - namely ray tracing.

By rendering a single screen aligned quad that covers the area of the star on screen, calculating a ray in the pixel shader that passes through the given pixel and then intersecting that ray with the sphere of the star you get a perfect circular edge from any distance and a true 3D point for shading and texturing purposes :


Not the most convincing star perhaps but it shows the ray tracing is working.  Next I wanted to give my star a nice swirly yellow and red pattern but as it's a sphere mapping a 2D texture onto it is a bit troublesome.  Three planar maps could be used and blended together (as I do for the terrain texture) but this tends to suffer from obvious blending artifacts as points move between planes and as the star is a perfect sphere this would account for quite a lot of the area.  A cube map could also be used and generated to avoid seams at the edges (as the skybox does) but as I wanted to animate the effect I was worried about getting enough variation this way.

What I went with in the end was using a 3D volume texture that stored various types and frequencies of noise in it's four RGBA channels.  Although volume textures can be memory hungry, I found that one that was only 64x64x64 in size produced enough variation for what I needed plus it also feels like a really handy texture to have around for future effects.  It's possible to generate noise in a pixel shader using ALU instructions which would save the memory cost but I suspect that my single volume texture read is likely as fast if not faster - although I don't have empirical evidence to back that up at the moment.

One difficulty with using a texture based noise function is that it's essential that the noise tiles smoothly to avoid visual seams where the texture wraps and temporal snapping when the noise is used for animation.  There are a few ways to ensure this but I went with a weighted trilinear blend of eight noise samples for each point in my volume to make sure it blended smoothly from one extreme of the volume to the other.  This also has the benefit of working for any underlying signal generator allowing me to experiment with different noise functions without having to make each of them tile individually.

Using the 3D sphere intersection point to look up into the noise texture, summing and scaling the four different frequencies found there and then mapping the resultant noise value onto a red-yellow-white colour spline produces this effect:


The effect really comes to life though once animation is applied by modulating the co-ordinates used to look up the noise texture over time, see the video below to see this in action.

It's already looking like a big ball of hotness but it's not quite there yet.  To make it look even hotter I add a glow effect by intersecting each pixels ray with not just the inner sphere representing the star's surface, but also with an outer sphere representing the outer edge of the star's corona.  Where the star surface is not hit but the corona is a fresnel term is calculated which is used to control the brightness of that pixel within the corona.  Fresnel is used here so the brightness varies with the angle between the ray from the camera to the intersection point on the corona sphere and the normal of the corona sphere at that point - essentially producing a low brightness where the ray from the camera is nearly tangental to the corona sphere's surface and a high brightness as the ray from the camera become more aligned with the sphere's normal.  In other words the more the ray "looks at" the star the brighter it is which achieves a nice glow around the star's surface:


With a little tweak this technique also works as the view point sinks into the corona filling the screen with progressively brighter colours as you near the surface of the star as one might expect.  To make it more interesting a random jitter is also applied to the radius of the corona sphere to make the effect a bit more lively at runtime.

Another effect which can help make objects look hotter is a touch of screen space distortion. This is an effect commonly used in games and films  where the screen above or around a hot object is given a shimmery effect to simulate the refractive shimmering witnessed in the atmosphere by currents of air with differing temperatures - look into the distance along a road surface on a hot day for example to see this in action.

Where this effect is being applied as a post-process on top of other rendering it can be achieved by taking the frame rendered so far (or in some cases the previous frame for speed) and using that as a source texture in conjunction with perturbed texture co-ordinates to re-render the affected area.  This can be expensive however and doesn't exactly do what I want in this case as I would like to produce some wibble on the surface of the star without affecting the corona.

For this I again dusted off my old ray tracing toolbox and found a suitable technique to achieve my goal.  Rather than render the star's surface once then perturb it afterwards I instead perturb the ray itself using the screen space pixel co-ordinates to index my trusty noise texture prior to testing for an intersection with the star's surface.  This produces a nice heat haze style wobble for the edges and interior of the star's surface but leaves the corona (which is still calculated with the un-perturbed ray) unaffected:


The effect is more obvious the closer you get to the surface so here's a shot from closer up:


and again it's more obvious in motion so see the video below for the full effect.

Finally to produce that desired "OMG My eyes!" look I additively blend on a halo sprite which maxes out some bright areas and produces a nice lens flare effect.  This halos sprite also ensures that the star is still visible when viewed from large distances where rendering the actual surface sphere would cover only a pixel or two if that and produces the sun glow effect when within the atmosphere of a planet.

The size of the halo sprite is also randomly jittered at runtime to make the effect more interesting - nothing scientific about that, it just looks better!

So there you have it, my very own star.  As mentioned above I think it looks best in motion so here's a video I captured to demonstrate just that:


Comments as always are welcome!
Tuesday, September 27, 2011

Fixing the holes in my Ozone layer


Although I've been working on the procedural architecture system to produce city buildings more interesting than simple boxes, I decided I had finally become irritated enough with a long standing bug to put that other work on hold and get it sorted.  The bug in question was in the atmospheric scattering shader and caused unsightly circular artifacts in the effect as the camera moved further and further away from the planet's surface:


The atmospheric scattering effect is an implementation of the algorithm described in Eric Bruneton and Fabrice Neyret's excellent paper Precomputed Atmospheric Scattering and to be fair to them the bug shown above wasn't a problem with their algorithm, it's a problem with the way that I am calculating the entry and exit points of the ray from the camera through each pixel into and out of the atmosphere.

The atmosphere is modelled as the space between two concentric spheres, one representing the inner most radius of the planet (the lowest possible point on the terrain) and one the outer most radius of the atmosphere.  Rather than render some sort of triangulated sphere with the atmospheric scattering shader on it however the effect is applied in screen space by rendering a full screen quad, the pixel shader for which calculates a ray from the camera through that pixel and into the space between these inner and outer spheres.  If your planet is perfectly smooth you can use an analytical ray-sphere intersection calculation to find the atmosphere intersecting portion of this ray which is generally good enough for distant views of the planet, but this fairly brutal assumption breaks down as you get closer to the planet as of course any sort of interesting terrain is by it's nature not perfectly flat.

As I want to be able to fly right down and walk around on the surface of my planet's terrain this simply wouldn't do, so instead of ray/sphere intersections I instead use the depth rendered by the terrain shader itself to calculate the end point of the atmospheric intersecting ray.  The terrain is rendered in two passes, the first is a Z pre-pass which only writes to the Z buffer while the second does all the texture sampling, blending and lighting before writing not just the final terrain colour but also a single floating point value representing the depth of that pixel to a separate depth buffer render target.  This depth buffer is a generally useful thing to have to hand, it's used to allow the edges of water geometry to alpha-blend smoothly where they intersect the terrain and also ultimately for soft particle effects - but one of it's most useful roles is for the atmospheric scattering as an accurate per-pixel distance allows for proper scattering on distant terrain rather than being limited to simple distance based fog solutions.


The problem however is that as you fly away from the planet the polygonal nature of the planet's geometry becomes apparent - the depth rendered by the terrain shader does not follow a true sphere but instead is only accurate at the vertices with the depths along the triangle edges and in their interiors being interpolated from these values.  As the triangles are flat though these interpolated values also describe flat surfaces so you get a facted depth image instead of a nice smooth sphere.  Once these faceted depth values are fed through the atmospheric scattering code areas where the erroneous interpolated depth produces points inside the inner atmosphere sphere produce understandibly incorrect scattering results and the artifacts seen above.

To resolve this I extended the atmospheric scattering pixel shader so when the camera is close to the planet it uses first the rendered per-pixel depth, when it's far away it uses an analytically computed ray-sphere intersection depth and when it somewhere in between these two thresholds it blends between the two based upon distance.  This ensures there is no visible glitch when switching from one method to the other and by the time the camera is far enough away to use the true sphere distances the terrain details are so small you can't see the difference anyway.


It would be slightly more optimal to produce three shaders each of which performed just one of these methods then switch between them depending on camera distance before rendering the scattering but I'll leave that as something for another day.  Another optimisation would be to render a quad or low polygon disk around the screen space bounds of the planet's atmosphere instead of a full screen quad to eliminate the increasingly large number of redundant pixels processed by the scattering shader as the planet becomes smaller on screen, this one I'm more likely to do as it really is very wasteful in these situations but for now I'm just happy to finally get rid of those ugly splotches!

Saturday, August 13, 2011

Found a very impressive blog: "Procedural World"

Despite experimenting with procedural worlds for years I only recently came across an excellent blog that I would heartily recommend anyone interested in this area takes a look at:

"Procedural World"

http://procworld.blogspot.com/


"Following one man's task of building a virtual world from the comfort of his pajamas. Discusses Procedural Terrain, Vegetation and Architecture generation. Also OpenCL, Voxels and Computer Graphics in general."

The breadth of task undertaken, the undeniable quality of the results and the fact that it's very much live and in progress make this one to watch for me.